HOLDING INSTRUMENTS Microsurgery requires fine control of instruments. To achieve this control, the
surgeon must be familiar with the advantages of different instrument
designs. Some surgical instruments have a serrated flat handle, others
have a rounded knurled handle, and still others have a round
serrated handle (Fig. 11). The serrated or knurled areas allow the surgeon a firmer grasp and tighter
control of the surgical instrument. An instrument with a round, knurled
handle may be rotated in the fingertips, allowing for greater
flexibility during some procedures. For example, some types of tying
forceps are designed with this option. In contrast, most ocular scissors
have a flat serrated handle. 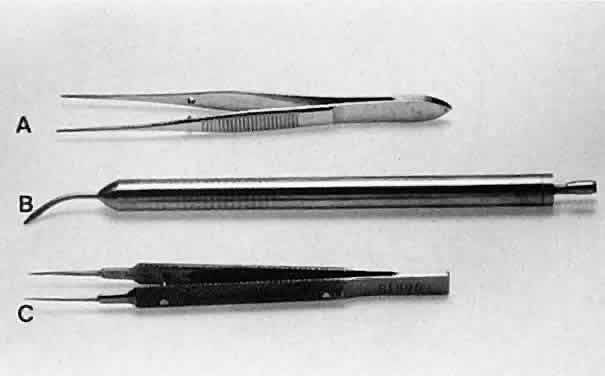 Fig. 11. Three surgical instruments with three handle styles. A. A flat serrated handle. B. A round serrated handle. C. A round knurled handle. Fig. 11. Three surgical instruments with three handle styles. A. A flat serrated handle. B. A round serrated handle. C. A round knurled handle.
|
No surgical instruments are intended to be held like a pencil, resting
in the crotch between the thumb and forefinger (Fig. 12).3 In conventional eye surgery, longer instruments usually are rested against
the first metacarpophalangeal joint, with the thumb and first two
fingers encircling the handle. Stability is achieved by resting the side
of the fifth finger on the periorbital facial structures. This method
of holding surgical instruments allows for rotation of the instrument
between the fingertips, by flexing the fingers, or by rotating the
wrist. Great mobility is necessary when using a needle holder (needle
driver) to pass a needle through tissue. When the surgeon encounters
resistance from the tissue, it is usually necessary for the surgeon to
twist the wrist or apply counter pressure on the tissue at the exit site
of the needle. Holding surgical instruments correctly provides the
surgeon with increased flexibility and mobility. The serrations on the
handle, regardless of style, allow the surgeon to hold the instrument
lightly, but firmly. With the level of precision of currently available
instruments, it is never necessary to grasp an instrument tightly. The
tendency to grasp instruments tightly must be avoided because it
decreases flexibility and increases fatigue of the hand and forearm muscles. Any
resistance encountered when placing an instrument into or out
of the eye is secondary to positioning of the instrument. Adjusting
the angle of the instrument or your hands should allow easier placement
of the instrument. 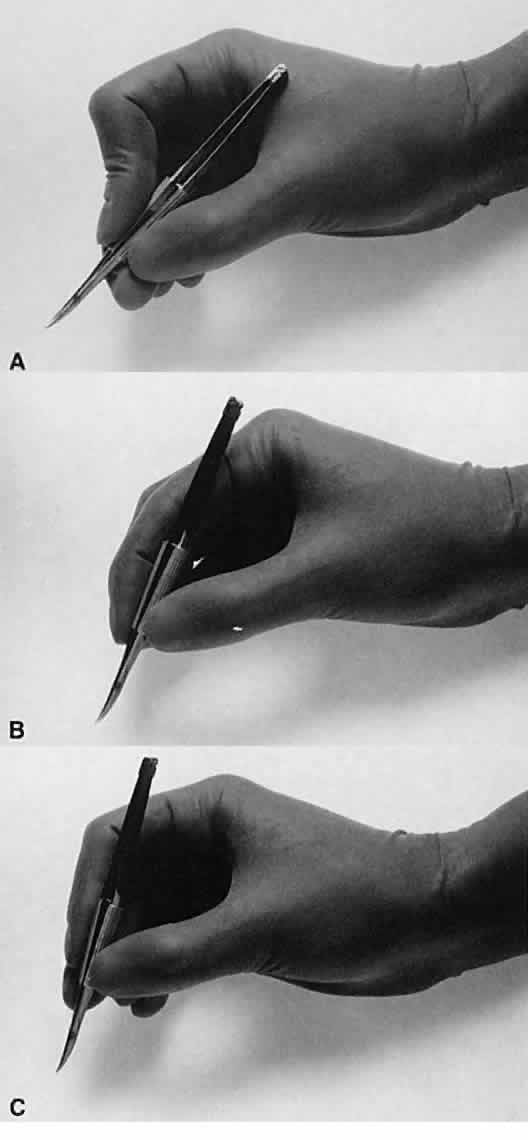 Fig. 12. A. A surgical instrument held like a pencil, resting in the crotch between
the thumb and the forefinger. No surgical instruments are intended to
be held in this manner. B. A longer surgical instrument held resting against the first metacarpophalangeal
joint of the first finger, with the thumb and the first finger
encircling the handle. This position allows for rotation of the instrument
between the fingertips or by flexing the fingers or wrist. C. The surgical instrument is held between the thumb and fingertips of the
second and third digits. This position allows for a more perpendicular
positioning of the instrument on the eye. Fig. 12. A. A surgical instrument held like a pencil, resting in the crotch between
the thumb and the forefinger. No surgical instruments are intended to
be held in this manner. B. A longer surgical instrument held resting against the first metacarpophalangeal
joint of the first finger, with the thumb and the first finger
encircling the handle. This position allows for rotation of the instrument
between the fingertips or by flexing the fingers or wrist. C. The surgical instrument is held between the thumb and fingertips of the
second and third digits. This position allows for a more perpendicular
positioning of the instrument on the eye.
|
Frequently, the beginning surgeon complains that an instrument does not
hold a fine suture, such as 10-0 nylon. Often, this problem results from
improper handling of the instrument. For example, the design of a
surgical tie calls for the surgeon to apply pressure at the flat serrated
handle to ensure that the tying platforms meet properly. If a torque
or oblique force is applied to the tying forceps, the 10-0 nylon may
be inadvertently sheared or may not be grasped tightly. To avoid this
problem, various instruments have a guide incorporated into the handle. The
guide requires proper alignment for the instrument to close (Fig. 13). The same difficulty may be encountered when using a locking needle holder. The
lock will hold only if the needle holder is positioned properly
within the surgeon's fingertips and the force applied is not
oblique to the handle. If the forces applied to the instruments exceed
those provided for in its construction, the components of the instrument
will bend and the jaws will not appose correctly (Fig. 14).4 Instruments have been designed to be held at the serrated portion of the
handle. Holding them more anteriorly or posteriorly alters the force
applied and may result in malfunctioning of the instrument. 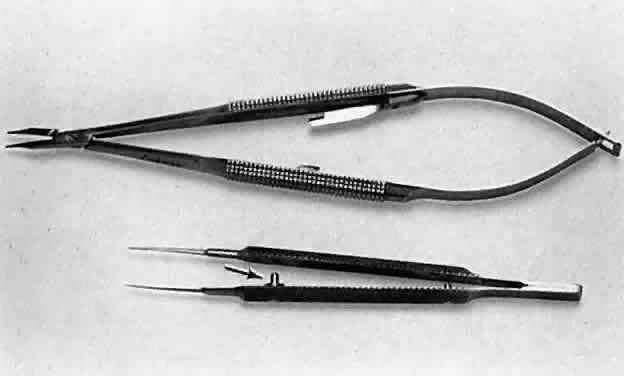 Fig. 13. A surgical tie is shown on the bottom. A guide is incorporated into the
handle (arrow). The guide ensures proper alignment for the instrument to close. On the
top, a locking needle holder is shown. The lock will hold only if the
needle holder is positioned properly in the surgeon's fingertips
and the force applied is not oblique to the handle. Fig. 13. A surgical tie is shown on the bottom. A guide is incorporated into the
handle (arrow). The guide ensures proper alignment for the instrument to close. On the
top, a locking needle holder is shown. The lock will hold only if the
needle holder is positioned properly in the surgeon's fingertips
and the force applied is not oblique to the handle.
|
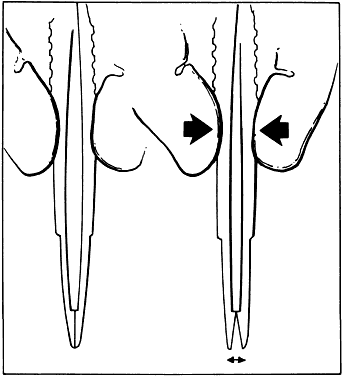 Fig. 14. When a proper degree of force is applied to the instrument, the tips will
align properly. However, if greater forces are applied, the instrument
bends and the jaws do not appose correctly. Fig. 14. When a proper degree of force is applied to the instrument, the tips will
align properly. However, if greater forces are applied, the instrument
bends and the jaws do not appose correctly.
|
GRASPING TISSUE Before using a forceps to grasp tissue, the surgeon must have a clear understanding
of the mechanism by which the instrument holds tissue and
the extent of damage caused by the instrument. In ophthalmology, three
instruments are used to grasp tissue: the smooth forceps, the toothed
forceps, and the spatula (the hook). Smooth forceps (i.e., forceps without teeth) must be used when handling
delicate tissues (Fig. 15). For example, smooth forceps are necessary when working with tissue that
must not be punctured or damaged, such as the conjunctiva during a
trabeculectomy. An absolutely smooth forceps with no defined grasping
surface usually is ineffective when handling the conjunctiva. Such a
forceps (also called a tying forceps)—is—used to hold fine
suture. Instead, serration of the grasping surface provides increased
friction without damaging the tissue. It is effective in handling the
conjunctiva because the conjunctival surface can conform to the ridges
of the serration. Criss-cross serrations permit traction in all directions. If
one attempts to use a serrated forceps on rigid material, such
as the sclera, only the tips of the serration will hold the tissue, reducing
the contact area and the effectiveness of the forceps (Fig. 16). Therefore, toothed forceps must be used to grasp the sclera effectively. 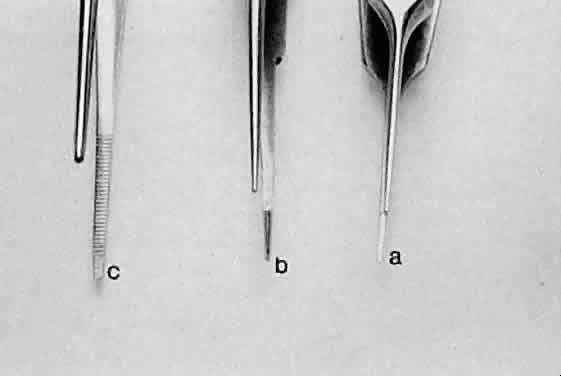 Fig. 15. Three different smooth forceps. On the right is an absolutely smooth forceps (A). In the middle is a grooved forceps (B). On the left is an instrument with a serrated platform (C). The instrument on the right is used to grasp fine suture, whereas the
instrument on the left is more commonly used to handle conjunctiva or
thin tissue that can conform to the ridges of the serration. Fig. 15. Three different smooth forceps. On the right is an absolutely smooth forceps (A). In the middle is a grooved forceps (B). On the left is an instrument with a serrated platform (C). The instrument on the right is used to grasp fine suture, whereas the
instrument on the left is more commonly used to handle conjunctiva or
thin tissue that can conform to the ridges of the serration.
|
 Fig. 16. When a smooth forceps is used to grasp rigid material, only the tips of
the instrument hold the tissue, thus reducing the contact area and effectiveness
of the forceps. A. When a smooth forceps is used to grasp rigid sclera, the forceps slips. B. Toothed forceps may be used more effectively to grasp rigid tissue such
as the sclera or cornea. Fig. 16. When a smooth forceps is used to grasp rigid material, only the tips of
the instrument hold the tissue, thus reducing the contact area and effectiveness
of the forceps. A. When a smooth forceps is used to grasp rigid sclera, the forceps slips. B. Toothed forceps may be used more effectively to grasp rigid tissue such
as the sclera or cornea.
|
Toothed forceps can have teeth at a 90-degree angle (surgical forceps) or
angled teeth (mouse-tooth forceps; Fig. 17). An example of a surgical toothed forceps is a 0.12-mm forceps; an example
of a forceps with angled teeth is the O'Brien forceps. Microscopic
examination of the instrument from the side determines tooth design. A
toothed forceps is needed for tough tissue, such as the cornea or
sclera, whereas soft tissues, such as the iris or conjunctiva, are better
handled with a smooth forceps (see Fig. 16). Surgical toothed forceps may damage delicate tissue; however, these
forceps exert a high degree of resistance, which is necessary for manipulating
tougher tissues. Forceps with angled teeth can seize tissue lying
in front of the end of the blades. For example, these forceps can
be used to grasp the muscle insertion through the conjunctiva (Fig. 18). The forceps can grasp a minimal amount of tissue and produce minimal
surface deformation, frequently without penetrating the tissue. The angle-tooth
forceps can be useful for grasping the cornea during corneal
transplant surgery or repair of corneal lacerations. If the teeth are
dull or bent, the forceps become ineffective. The number and orientation
of the teeth on a forceps affect the stability of fixation and tissue
damage. Teeth angled at 90 degrees provide good fixation, but greater
tissue damage than teeth angled at 45 degrees (mouse-tooth forceps). Increasing
the number of teeth also increases the degree of tissue
fixation. One example is the Thorpe corneal fixation forceps, in which
the 90-degree teeth are in a 2 × 3 configuration. The Thorpe corneal
fixation forceps has been modified with 45-degree angled 0.12-mm
teeth in a 2 × 3 configuration, thus allowing for increased stability
of tissue fixation, with limited tissue damage. When driving or
passing a needle through tissue that is fixed with a toothed forceps, the
forceps should be held such that the needle enters the tissue on
the side of the forceps with the greatest number of teeth. In other words, when
a Thorpe corneal fixation forceps is used, the needle should
pass through the tissue on the edge that is secured by three teeth. This
maneuver limits the twisting of the tissue as the needle is advanced
through the tissue. Finally, an alternative is the Pierse-type forceps, which
has no teeth but has a small hollow area immediately posterior
to the tip. This hollow area allows for tissue displacement instead
of the tearing of tissue that occurs with sharp-toothed forceps. 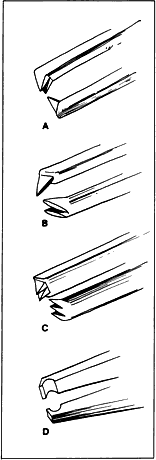 Fig. 17. Tooth forceps may be separated by the angle of insertion of the teeth. A. Forceps with teeth at a 90-degree angle. B. A mouse-tooth forceps with angled teeth. C. A Thorpe corneal fixation forceps with 45-degree angled 0.12-mm teeth
in a 2 × 3 configuration. D. A Pierse-type forceps with no teeth but with a small hollow area immediately
posterior to the tip. Fig. 17. Tooth forceps may be separated by the angle of insertion of the teeth. A. Forceps with teeth at a 90-degree angle. B. A mouse-tooth forceps with angled teeth. C. A Thorpe corneal fixation forceps with 45-degree angled 0.12-mm teeth
in a 2 × 3 configuration. D. A Pierse-type forceps with no teeth but with a small hollow area immediately
posterior to the tip.
|
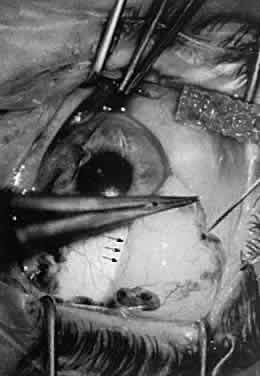
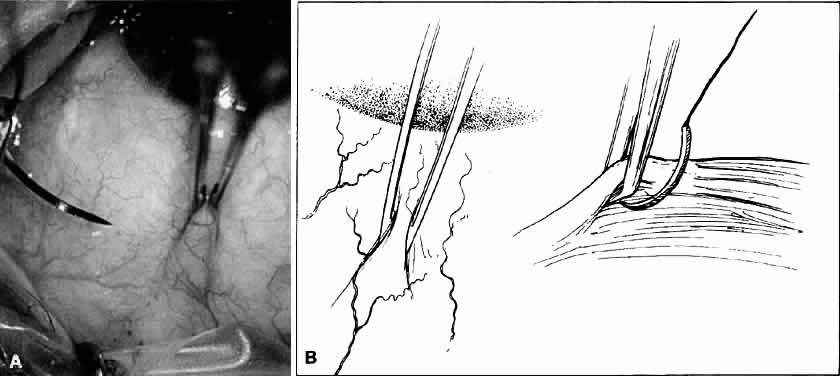 Fig. 18. A. Forceps with angled teeth can grasp tissue lying in front of the end of
the teeth. A forceps with angled teeth is seen grasping the superior
rectus muscle insertion through the conjunctiva before placement of a
bridal suture. B. The muscle is pulled off the globe by the forceps, and the suture is allowed
to pass beneath the body of the muscle. Fig. 18. A. Forceps with angled teeth can grasp tissue lying in front of the end of
the teeth. A forceps with angled teeth is seen grasping the superior
rectus muscle insertion through the conjunctiva before placement of a
bridal suture. B. The muscle is pulled off the globe by the forceps, and the suture is allowed
to pass beneath the body of the muscle.
|
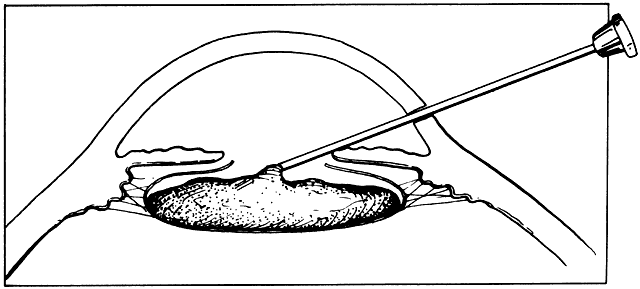
A spatula has a uniform cross section throughout its length, which allows
the instrument to be inserted through a small incision. Manipulation
with the spatula may be performed at a site distant to the insertion
site or place of incision. With the use of the incision as a pivot, the
spatula may be used to separate tissues, such as iris adhesions (Fig. 19). Hooks are used to move tissue with a pulling or pushing motion. Sharp
hooks usually are avoided in microsurgery because they tend to traumatize
surrounding tissues. A simple hook may be used to push the iris
tissue out of the way or to engage an intraocular lens (IOL) and rotate
it into position (Fig. 20). A collar buttonhook can push and pull in any direction, but it must
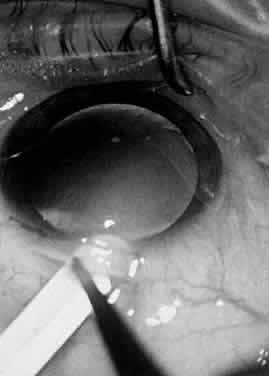
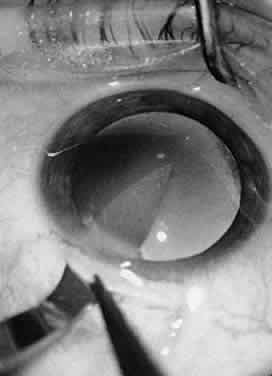
be inserted sideways so that it will not be caught on the wound edge. 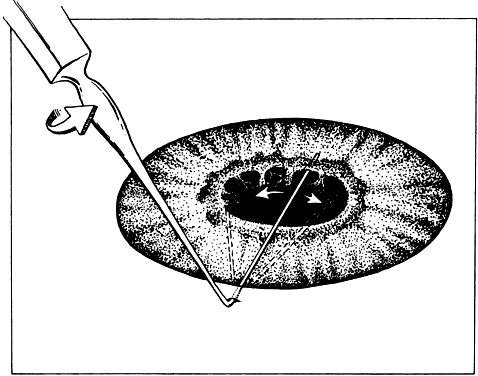 Fig. 19. A spatula is used at a site distant from its insertion. The spatula is
inserted through a small incision at the limbus. The tip of the spatula
is placed between the anterior lens capsule and the iris. The spatula
is rotated to lyse adhesions (synechiae) between the iris and the anterior
lens capsule. Fig. 19. A spatula is used at a site distant from its insertion. The spatula is
inserted through a small incision at the limbus. The tip of the spatula
is placed between the anterior lens capsule and the iris. The spatula
is rotated to lyse adhesions (synechiae) between the iris and the anterior
lens capsule.
|
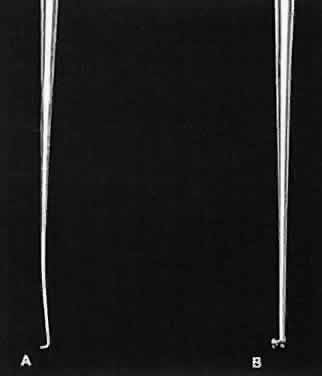 Fig. 20. Two hooks that may be used to move tissue with a pulling or pushing movement. A. A Sinsky hook. B. A Graether collar button. This hook can push and pull tissue in any direction, but
it must be inserted sideways so that it will not catch on
the wound edge. Fig. 20. Two hooks that may be used to move tissue with a pulling or pushing movement. A. A Sinsky hook. B. A Graether collar button. This hook can push and pull tissue in any direction, but
it must be inserted sideways so that it will not catch on
the wound edge.
|
INCISING TISSUE Tissues are separated by one of two basic techniques: blunt dissection
or sharp dissection. Tissue is cut with either a knife or a scissors. During
microsurgery, it is essential for the surgeon to understand the
concepts of the division of tissue and how this division is best accomplished
with appropriate instrumentation. Three major factors influence tissue dissection: the shape and sharpness
of the instrument used, the properties of the tissue being cut, and
the way in which the surgeon guides the instrument during the cutting
process. The tissue itself has several properties, including thickness
and sectility (the tendency of the fibers to be sectioned, rather than
displaced, by a blade). Tension of the tissue also affects how easily
the tissue can be cut. It is possible to vary the tissue tension by
applying traction with a forceps. However, using a forceps may deform
the tissue, making it necessary to alter movements of the blade to obtain
the intended cut. The shape of the cut is determined by the path taken
by the blade through the tissue. Unless otherwise directed, the blade
will follow the path of least resistance when incising tissue. This
path has been referred to as the preferential path. Deviations from the preferential path are made more easily by using only
a small part of the blade to enter the tissue.4 When lamellar tissue (e.g., sclera, and especially cornea) is dissected, the
resistance is lowest in the direction of the lamination, rather
than at right angles to it. Blunt dissection promotes use of lamellar tissue planes and is best chosen
when tissue layers are being separated. In blunt dissection, tissue
fibers are stretched and split to the point of separation. This technique
is effective only when tissue planes exist. Therefore, blunt dissection
must be performed in a potential tissue plane. The surgeon must
be guided by the tissue planes and must not attempt to override or change
them. Blunt dissection is achieved by advancing the scissors' tips
and opening the scissors' blades, or by using a spatula. Sharp dissection is needed to cut across the lamellae. It may be accomplished
with either a single blade or a scissors. When using a blade, the
surgeon must distinguish between cutting with the point of the blade
or with the cutting edge of the blade (Fig. 21). The point of the blade is a versatile cutting instrument that can produce
incisions of any shape. Because the blade point must be extremely
sharp, blades are either disposable or constructed of highly resistant
material (e.g., diamond). The surgeon can vary the amount of the cutting
edge that penetrates the tissue to make a straight versus a curved
incision (Fig. 22). For a straight incision, the blade should be held so that the maximum
amount of the linear cutting edge comes between the edges of the incision. For
a curved incision, a small amount of the blade surface should
penetrate the tissue to allow for alterations in the direction of the
incision. 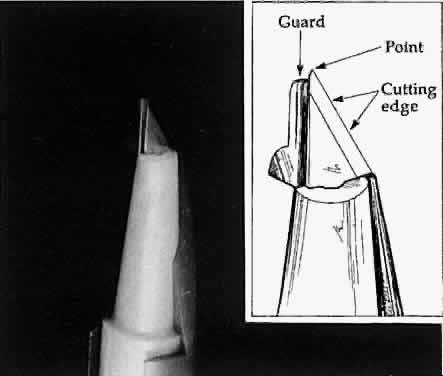 Fig. 21. A guarded blade. The cutting edge is distinguished from the point of the
blade. The point of the blade is more versatile than the cutting edge
for producing incisions of various shapes. Fig. 21. A guarded blade. The cutting edge is distinguished from the point of the
blade. The point of the blade is more versatile than the cutting edge
for producing incisions of various shapes.
|
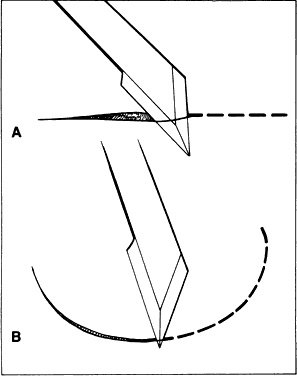 Fig. 22. The amount of the cutting edge that penetrates the tissue changes the shape
of the incision. A. When the cutting edge penetrates the tissue, it is difficult to curve, which
results in a straight incision. B. When the point of the blade is used, a curved incision is more easily
made. Fig. 22. The amount of the cutting edge that penetrates the tissue changes the shape
of the incision. A. When the cutting edge penetrates the tissue, it is difficult to curve, which
results in a straight incision. B. When the point of the blade is used, a curved incision is more easily
made.
|
Scissors can be used in three ways to cut tissue: closing the blades, opening
the blades, and advancing the tips of the blades. Two basic types
of scissors are used in ophthalmic surgery: scissors with ringed handles
and a simple screw joint, and scissors with a spring handle (Fig. 23). The blades of the scissors may be straight or curved. The ability of
scissors to cut depends a great deal on the thickness of the tissue. In
principle, scissors crush tissues before separating or cutting them. In
thick tissues, such as full-thickness cornea and sclera, the profile
of a scissors' cutting tissue has an S-shape (Fig. 24). This shape is most exaggerated in tissue that is not very mobile, such
as the cornea and sclera. 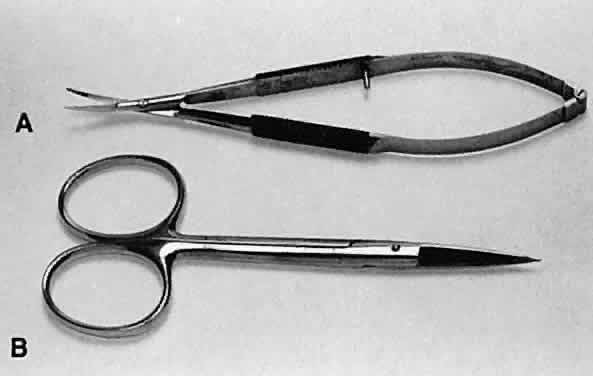 Fig. 23. Two types of scissors are used for most ophthalmic surgery. A. Spring-handle scissors. B. Ring-handle scissors with a simple screw joint. The blades may be straight
or curved, and the scissors may be used for blunt or sharp dissection. Fig. 23. Two types of scissors are used for most ophthalmic surgery. A. Spring-handle scissors. B. Ring-handle scissors with a simple screw joint. The blades may be straight
or curved, and the scissors may be used for blunt or sharp dissection.
|
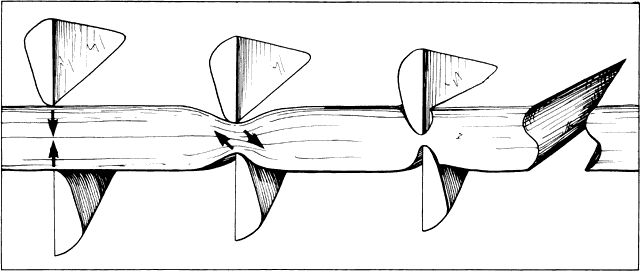 Fig. 24. When scissors are used to cut thick tissue, they crush the tissue before
separating it. As the tissue is crushed, oblique forces are applied
such that the incised tissue has an S shape when viewed in profile. Fig. 24. When scissors are used to cut thick tissue, they crush the tissue before
separating it. As the tissue is crushed, oblique forces are applied
such that the incised tissue has an S shape when viewed in profile.
|
One potential problem with scissors is the tendency to produce a serrated
edge. When the scissors are advanced and the direction of the cut is
changed, or the tissue is compressed, a serrated edge results (Fig. 25). When the scissors' tips are closed completely, they penetrate completely
into the tissue and produce a small lateral cut.4 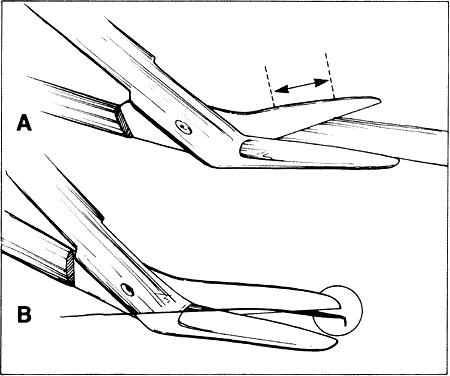 Fig. 25. When scissors are used to cut tissue, it is important to avoid producing
a serrated effect. A. Scissors are closed partially (arrows), reopened carefully, and advanced following the original direction of
the cut. B. When the tips are closed completely, they will penetrate tissue and act
as a cutting edge, producing a small lateral cut. This movement causes
a serrated effect. Fig. 25. When scissors are used to cut tissue, it is important to avoid producing
a serrated effect. A. Scissors are closed partially (arrows), reopened carefully, and advanced following the original direction of
the cut. B. When the tips are closed completely, they will penetrate tissue and act
as a cutting edge, producing a small lateral cut. This movement causes
a serrated effect.
|
When using scissors to cut tissue, it is preferable to avoid producing
a serrated edge. This may be avoided if scissors are closed partially, reopened, and
carefully advanced in the original direction of the cut. Without
removing the scissors from the wound, the blades are reapplied
to the tissue and again opened and advanced in the original direction
of the cut. This maneuver is important when making a large incision, such
as in corneal transplantation or large incision cataract extraction. Therefore, when
scissors are used to create a limbal wound, the
inferior blade is inserted into the anterior chamber and the scissors
are compressed partially, released, and advanced. Care must be taken to
avoid changing the direction of the cut, closing the scissors completely, or
removing the scissors from the wound before completion. Using
this technique will avoid an irregular serrated incision. All spring-handled scissors are designed such that applying pressure on
the posterior handle of the scissors controls the upper blade of the
scissors. The surgeon must understand this concept when incising tissue
in situations in which the lower blade is inside the eye and the upper
blade is outside the eye. Obviously, excessive movement of the lower
blade that is inside the eye should be avoided to prevent damage to
the intraocular structures. Troutman-Katzin and Moore-Troutman scissors
are designed so that the lower blade remains immobile and only the upper
blade may be compressed to incise tissue. Scissors are a safe instrument to use because they divide only the tissue
lying between the blades, avoiding inadvertent incisions. In addition, scissors
are versatile. The disadvantage of scissors is that very
thick tissue can be difficult to incise. Making a preliminary partial-thickness
incision before the tissue is cut with the scissors can reduce
this problem. Scissors also may be used surgically by opening the blades. This maneuver
is employed primarily during blunt dissection (Fig. 26). In this procedure, the surgeon is cutting with the blade tips. Sharp
points can force their way through tissue, whereas blunt tips act as
a spatula and do not damage surrounding structures. When the surgeon dissects
a conjunctival flap or into the sub-Tenon's space, blunt
dissection is preferred. In addition, should the surgeon need to avoid
disturbing the flaps (or a buttonhole), such as a conjunctival flap for
a glaucoma procedure, the surgeon should not use scissors with sharp
tips for blunt dissection. However, when the surgeon is working in an
area that is scarred as a result of previous surgery, the use of sharp
tips may be necessary. 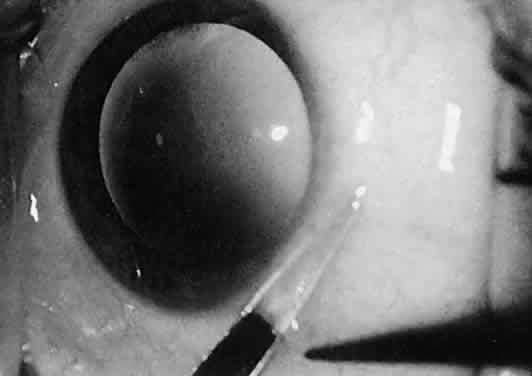 Fig. 26. The sharp points of scissors are forcing their way through the subconjunctival
space. Opening the scissors will result in blunt dissection of
the subconjunctival space. Fig. 26. The sharp points of scissors are forcing their way through the subconjunctival
space. Opening the scissors will result in blunt dissection of
the subconjunctival space.
|
SUTURING TISSUE Three instruments are necessary to suture tissue properly. The first is
the instrument to grasp the tissue, either a smooth or a toothed forceps. The
second is the needle holder (needle driver). The third is the
tying forceps. In some situations, toothed forceps can be combined with
a tying platform to create multipurpose forceps (Fig. 27). It is a basic surgical principle that for any needle to pass through
tissue, the resistance of the needle and the needle holder must exceed
that of the tissue through which the needle is passing. In ocular microsurgery, tissue
resistance is low, compared with that encountered in
general surgery; however, if the needle holder is used improperly, the
danger of needle deformation is great because ophthalmic needles in
general are very delicate. Ideally, the cross-section of the needle holder
should match the curvature of the needle, thus preventing needle
deformation when the needle is driven through tissue. Therefore, large, locking
needle holders may be used to grasp large needles, and fine
needle holders should be used for ultrasharp needles. With very fine, flat
jaws, there is little danger of needle damage when ultrasharp needles
are passed through tissue with minimal resistance. Ideally, the
needle holder should grasp the needle shaft one half to two thirds of
the way from the needle tip (Fig. 28). The needle is likely to flip if it is not seated at a right angle to
the needle holder. When the needle is properly seated in the needle holder, at
a 90-degree angle, the surgeon must flex the wrist to increase
mobility and pass radial sutures in all meridians. Simply dropping
the shoulder of the arm that is holding the needle holder increases the
surgeon's range of motion considerably. Lowering the magnification
during suturing enlarges the field and thus allows better manipulation
of the ties and ease of suturing. 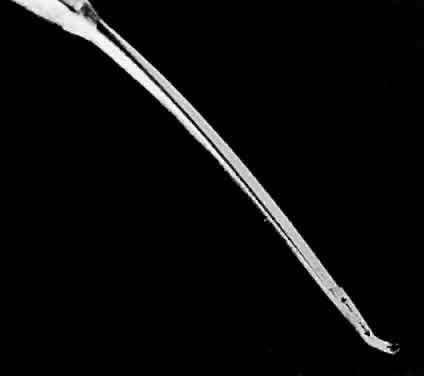 Fig. 27. A combination forceps in which a toothed forceps also has a tying platform (arrows) to create a multipurpose forceps. Fig. 27. A combination forceps in which a toothed forceps also has a tying platform (arrows) to create a multipurpose forceps.
|
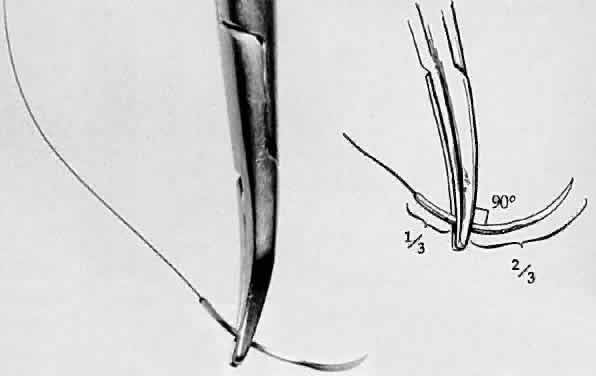 Fig. 28. A needle holder is shown grasping a surgical needle approximately two thirds
of the way from the head of the needle to the suture. The needle
is seated properly in the needle holder at a 90-degree angle. Fig. 28. A needle holder is shown grasping a surgical needle approximately two thirds
of the way from the head of the needle to the suture. The needle
is seated properly in the needle holder at a 90-degree angle.
|
Tying forceps must avoid damage to delicate suture materials yet grip the
suture firmly. It is important for the surgeon to keep in mind that
the suturing of tissue should not be done at the expense of overly stretching
the tissue to be sutured. Instead, the goal of the surgeon should
be to ensure that the tissue could be apposed without being stretched. Furthermore, tissue
edges must be respected. Using rounded side
edges will avoid damage to suture materials; however, proper handling
of the forceps is key. The tip of the tying platform should be used to
pick up the suture. If the suture material cannot be grasped, the tying
platform should be inspected for incomplete closure due to damage of
the platform or incarceration of foreign matter. However, overcompression
of the handle may cause the tying platform to gape (see Fig. 14). If the suture is loaded into the tying forceps longitudinally so that
the suture becomes simply an extension of the forceps, it is much easier
to wrap the suture around another tying platform to secure the tissue (Fig. 29). 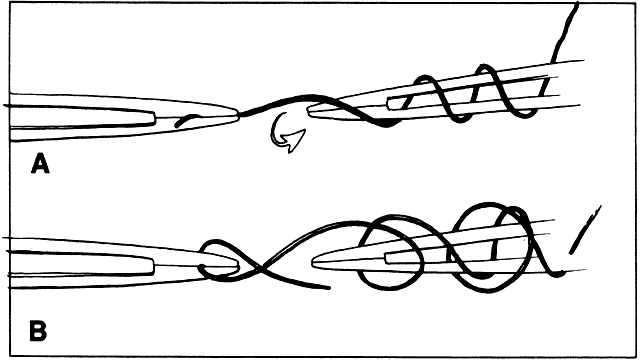 Fig. 29. A. Suture is loaded into tying forceps longitudinally on the top so that
the suture becomes an extension of the forceps. This positioning increases
the ease with which the surgeon wraps the suture around the tying
platform. B. The suture is loaded obliquely in the tying platform. This placement frequently
makes wrapping the suture around another tying forceps more
difficult. Fig. 29. A. Suture is loaded into tying forceps longitudinally on the top so that
the suture becomes an extension of the forceps. This positioning increases
the ease with which the surgeon wraps the suture around the tying
platform. B. The suture is loaded obliquely in the tying platform. This placement frequently
makes wrapping the suture around another tying forceps more
difficult.
|
HEMOSTASIS Hemostasis commonly is achieved by applying heat to tissue, which causes
coagulation. Cauterization may range from interruption of blood flow
of vessels to blanching of tissue, gross charring of tissue, and in extreme
cases, tissue contraction (Fig. 30). The only way to monitor the application of heat is by anticipating the
power needs and visualizing the results. Care in this area is key to
controlling the delivery of heat to tissues. Excessive heat may cause
tissue contraction and wound deformation. Heat is generated in tissues
by monopolar or bipolar diathermy. Monopolar miniature diathermy probes
are used for intraocular coagulation. Bipolar diathermy is used to
generate heat in tissues either by grasping the tissue to be coagulated
or by applying indirect bipolar diathermy through a liquid film. With
either method of delivery, the bipolar diathermy unit requires that
the tissue to be coagulated remain between the probes of the diathermy
unit. Therefore, the forceps tips of the diathermy unit must be closely
approximated but not touching. As soon as the bleeding vessel coagulates, the
foot pedal should be released to limit tissue contraction. Changing
the voltage while keeping the space between the diathermy probes
constant controls the diathermy. In this way, increased voltage
results in increased energy delivery; however, in effect, keeping the
voltage constant and bringing the probes closer together increases the
energy delivered to the tissue. Delivery of excessive heat or energy
causes significant tissue shrinkage that may result in wound deformation. 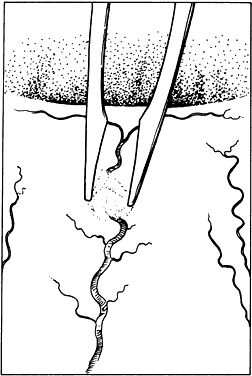 Fig. 30. Hemostasis achieved through cauterization provides for interruption of
blood flow in vessels. The application of heat is monitored through visualizing
results. Excessive tissue shrinkage should be avoided. Coagulation
is visualized by the interruption of blood flow through the vessel. Fig. 30. Hemostasis achieved through cauterization provides for interruption of
blood flow in vessels. The application of heat is monitored through visualizing
results. Excessive tissue shrinkage should be avoided. Coagulation
is visualized by the interruption of blood flow through the vessel.
|
|
